Friday, March 14, 2025

Using Oracle Database API for MongoDB in Oracle Database 23ai -- Index Creation --

When you migrate the DB from MongoDB to oracle 23ai, the Indexes "are not" automatically moved. You need to create each one of them after moving the data.


To complete this step in the migration, you need to identify the indexes from Mongodb. 

There are several ways to index JSON data, you can use a B-tree or bitmap function-based index for SQL/JSON function json_value queries. Such an index targets a single scalar JSON value. A bitmap index can be appropriate wherever the number of possible values for the function is small. 

For example, you can use a bitmap index for json_value if the values targeted are expected to be few. Please check below as example.

First you need identify the indexes from MongoDB

You can use db.<collection>.getIndexes() to identify the Indexes. For example:


Next step, you need to create indexes on Oracle23ai DB. 

Note: You can index scalar values in your JSON data using function-based indexes. In addition, you can define a JSON search index, which is useful for both ad hoc structural queries and full-text queries.


For this example, the employee collection was created.

db.createCollection('employee');


Some records were inserted:

db.employee.insertOne({"name":"Carlos Flores","job": "Intern","salary":30000});
db.employee.insertOne({"name":"Armando Castro","job": "Programmer","salary": 60000,"email" : "acastro@oracle.com"});
db.employee.insertOne({"name":"Miguel Lopez","job": "Manager","salary": 70000});
db.employee.insertOne({"name":"Luis Flores","job": "Intern","salary":40000});
db.employee.insertOne({"name":"Patricio Hernandez","job": "Programmer","salary": 70000,"email" : "phernandez@oracle.com"});
db.employee.insertOne({"name":"Hugo Sanchez","job": "Manager","salary": 90000});


Create an index (using the reference from Mongo), for this case:

create index "idx_emp_name" on "PT"."employee" (JSON_VALUE("DATA",'$.name' returning VARCHAR2(60) ERROR ON ERROR NULL ON EMPTY) ASC,1)


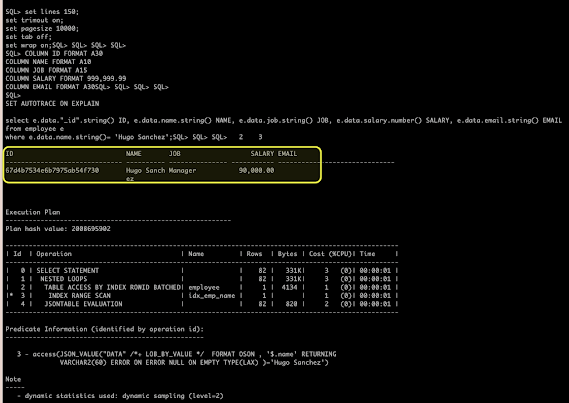
Execution Plan Indication that a JSON Search Index Is used, you can validate the creation, including the execution plan:


set lines 150;
set trimout on;
set pagesize 10000;
set tab off;
set wrap on;
 
COLUMN ID FORMAT A30
COLUMN NAME FORMAT A10
COLUMN JOB FORMAT A15
COLUMN SALARY FORMAT 999,999.99
COLUMN EMAIL FORMAT A30
 
SET AUTOTRACE ON EXPLAIN

select e.data."_id".string() ID, e.data.name.string() NAME, e.data.job.string() JOB, e.data.salary.number() SALARY, e.data.email.string() EMAIL
from employee e
where e.data.name.string()= 'Hugo Sanchez';


If you want to create an index on the number column you can use the next:

create index "idx_emp_salary" on "PT"."employee" (JSON_VALUE("DATA",'$.salary' RETURNING NUMBER));


db.employee.getIndexes();


For more references, you can check: 


Saturday, December 21, 2024

Using Oracle Database API for MongoDB in Oracle Database 23ai


Using Oracle Database API for MongoDB in Oracle Database 23ai


Oracle Database API for MongoDB lets interact with JSON collectons in Oracle Database using MongoDB commands. In other words, you can execute mongo commands in Oracle DB 23ai.
This allows you to switch MongoDB applications to run transparently in Oracle's converged database.

Starting with ORDS release 22.3, Oracle REST Data Services supports the Oracle Database API for MongoDB when running in a standalone mode. 

If you want move from any Mongo DB to Oracle Database 23ai you can follow the next steps:

Assumptions:

1. You have an oracle DB23ai ready to use.
2. You have added the service name enabled in the tnsnames.ora file (in this case we are using pdb)
3. You aere using ORDS release 22.3 or later, Oracle REST Data Services supports the Oracle Database API for MongoDB running in a standalone mode. 

Steps

1.  Install Tools and Drivers for Oracle Database API for MongoDB:

wget  http://repo.mongodb.org/yum/redhat/8Server/mongodb-org/4.4/x86_64/RPMS/mongodb-mongosh-2.1.1.x86_64.rpm

wget http://repo.mongodb.org/yum/redhat/8Server/mongodb-org/4.4/x86_64/RPMS/mongodb-database-tools-100.9.5-1.x86_64.rpm

Download the packages according your OS version from:

https://repo.mongodb.org/yum/redhat/7/mongodb-org/4.4/x86_64/RPMS/

sudo rpm -ivh mongodb-mongosh-2.1.1.x86_64.rpm

sudo rpm -ivh mongodb-database-tools-100.9.5-1.x86_64.rpm


yum -y install jdk-23_linux-x64_bin.rpm


2. Install ORDS

ORDS-enabled schema. 
For example, when are you insert a JSON document into a collection in the database foo, the API for MongoDB inserts the document into a collection in the ORDS-enabled schema (PT in our case).

Download the ORDS from:

Unzip 
/u01/app/oracle/product/23.0.0.0/dbhome_1/ords

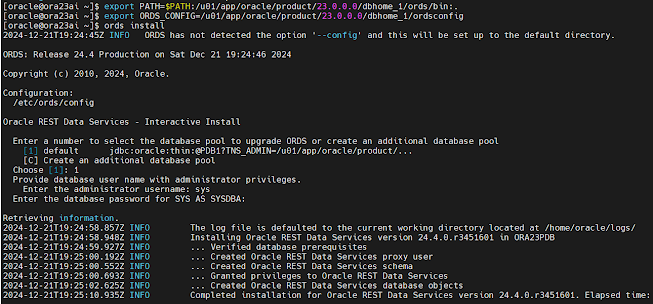
Set environment and install ORDS
mkdir -p /u01/app/oracle/product/23.0.0.0/dbhome_1/ordsconfig
export PATH=$PATH:/u01/app/oracle/product/23.0.0.0/dbhome_1/ords/bin:.
export ORDS_CONFIG=/u01/app/oracle/product/23.0.0.0/dbhome_1/ordsconfig

ords install


After installation you can use ctrl-c to continue the API Configuration

Configure ORDS to enable MongoDB API

Execute the next ORDS command  to enable MongoDB API

ords config set mongo.enabled true


ords serve


3.  Create database user with correct privileges:


sqlplus system/******@pdb1

create user PT identified by ****** default tablespace users;
grant connect, create session, resource to PT;
grant soda_app, unlimited tablespace to PT;


sqlplus PT/******@pdb1
exec ords.enable_schema(true);
exit;


4. Connect 

Sintaxis Reference
mongodb://[{user}:{password}@]localhost:27017/{user}?authMechanism=PLAIN&authSource=$external&ssl=true&retryWrites=false&loadBalanced=true

In our case:
mongodb://PT:*****@localhost:27017/PT?authMechanism=PLAIN&authSource=$external&ssl=true&retryWrites=false&loadBalanced=true

You can export to any variable if you want 

export URI='mongodb://PT:*****@localhost:27017/PT?authMechanism=PLAIN&authSource=$external&ssl=true&retryWrites=false&loadBalanced=true'

mongosh --tlsAllowInvalidCertificates $URI


Additionally, if you want to start/stop the ords using a script, you can create, using the next:

vi $ORDS_HOME/bin/start_ords.sh

#!/bin/bash
export ORDS_HOME=$ORACLE_HOME/ords
export DATE=`date +%Y%m%d.%T`
export ORDS_CONFIG=/etc/ords/config
export ORDS_LOGS=$ORDS_HOME/logs
export LOGFILE=$ORDS_LOGS/ords_$DATE.log
export TNS_ADMIN=$ORACLE_HOME/network/admin
nohup ${ORDS_HOME}/bin/ords --config ${ORDS_CONFIG} serve >> $LOGFILE 2>&1 &
echo “View log file with : tail -f $LOGFILE”


vi $ORDS_HOME/bin/stop_ords.sh

#!/bin/bash
PATH=/usr/sbin:/usr/local/bin:/usr/bin:/usr/local/sbin:/u01/app/oracle/product/23.0.0.0/dbhome_1/bin:/u01/app/oracle/product/23.0.0.0/dbhome_1/ords/bin:$PATH
kill `ps -ef | grep [o]rds.war | awk '{print $2}'`

Add Execution Permissions to the scripts:

chmod u+x $ORDS_HOME/bin/s*.sh

Now, you can connect:


If you want more details

Monday, November 4, 2024

Deploy Autonomous Database Free in Mac M1/M2


1.        Install Homebrew


/bin/bash -c "$(curl -fsSL https://raw.githubusercontent.com/Homebrew/install/HEAD/install.sh)"


Note: You need have your password to login on the Mac and take several minutes


2.         Initialize your container on Mac (M1/M2)


  We don't have an ARM native image yet.  It's an x86-64 image. Colima VM will emulate the x86-64 Arch to run the container.


 /opt/homebrew/bin/brew install docker


/opt/homebrew/bin/brew install docker-compose


/opt/homebrew/bin/brew install colima


/opt/homebrew/bin/brew reinstall qemu


echo 'eval "$(/opt/homebrew/bin/brew shellenv)"' >> ~/.zshrc

eval "$(/opt/homebrew/bin/brew shellenv)"


/opt/homebrew/opt/colima/bin/colima start --cpu 4 --memory 8 --arch x86_64


3.      Create directories


mkdir -p ~/Documents/u01/data

chmod -R 775 ~/Documents/u01/data

chmod -R 775 ~/Documents


4.      Create and run your container from the image

        (This task can take several minutes, monitor the log until finish)


docker run -d \

-p 1521:1522 \

-p 1522:1522 \

-p 8443:8443 \

-p 27017:27017 \

-e WORKLOAD_TYPE=ATP \

-e WALLET_PASSWORD=Or4cl3152024## \

-e ADMIN_PASSWORD=Or4cl3152024## \

--cap-add SYS_ADMIN \

--device /dev/fuse \

--volume adb_container_volume: ~/Documents/u01/data \

--name adb-free \

container-registry.oracle.com/database/adb-free:latest-23ai


5. Check container creation

docker ps -a


6. Review Logs


docker logs adb-free


7.   Create Alias


alias adb-cli="docker exec adb-free adb-cli"


8.   Install sqlcl


/opt/homebrew/bin/brew install sqlcl


9. Enable env variables

export PATH=/opt/homebrew/Caskroom/sqlcl/24.1.0.087.0929/sqlcl/bin:"$PATH"

sql -v

mkdir -p ~/Documents/wallet_adb_free_container

cd ~/Documents/wallet_adb_free_container

docker cp b806a784aa6d:/u01/app/oracle/wallets/tls_wallet ./

export TNS_ADMIN=~/Documents/wallet_adb_free_container/tls_wallet


cd ~/Documents/wallet_adb_free_container/tls_wallet

ls -ltr

cat tnsnames.ora

echo $TNS_ADMIN


10.   Connect to ADB


sql ADMIN@myatp_high


Thursday, October 5, 2017

Tuesday, July 8, 2014

ASM


Architecture for Oracle Database 11g


ASM Commands


########################
# Check de +ASM Disks  #
########################

set lines 188
col path for a39
col name for a33
set pagesize 200
select GROUP_NUMBER,DISK_NUMBER,NAME,PATH,TOTAL_MB,FREE_MB,TOTAL_MB,MODE_STATUS,STATE,HEADER_STATUS
from  v$asm_disk
order by 10,4,1,2
/
###################################
# To monitor rebalance +ASM Disks #

###################################

select * from v$asm_operation;


###################################
# Check status for +ASM Disks     #
###################################

set lines 180
col PATH for a40
SELECT group_number, disk_number, mount_status, header_status, state, path from v$asm_disk;
/


To Check ASM Disks and Paths
 /etc/init.d/oracleasm listdisks | xargs /etc/init.d/oracleasm querydisk -p


ASMLIB
To Start/Stop ASMLIB
/etc/init.d/oracleasm start
/etc/init.d/oracleasm stop

To Check ASM Disks in ASMLIB
/etc/init.d/oracleasm listdisks

To find device on /dev/*
[oracle@addb01 ~]$ ls -l /dev/* | grep '253,' | grep 56
brw-rw----  1 root root 253,   56 Jan 31 16:29 /dev/dm-56
brw-rw----  1 root   disk     253, 56 Jan 31 16:29 mpath11p1


For ASMLIB level, you can check
ls -al /dev/oracleasm/disks/*
/usr/sbin/oracleasm-discover 'ORCL:*'