Using Oracle Database API for MongoDB in Oracle Database 23ai
Oracle Database API for MongoDB lets interact with JSON collectons in Oracle Database using MongoDB commands. In other words, you can execute mongo commands in Oracle DB 23ai.
This allows you to switch MongoDB applications to run transparently in Oracle's converged database.
Starting with ORDS release 22.3, Oracle REST Data Services supports the Oracle Database API for MongoDB when running in a standalone mode.
If you want move from any Mongo DB to Oracle Database 23ai you can follow the next steps:
Assumptions:
1. You have an oracle DB23ai ready to use.
2. You have added the service name enabled in the tnsnames.ora file (in this case we are using pdb)
3. You aere using ORDS release 22.3 or later, Oracle REST Data Services supports the Oracle Database API for MongoDB running in a standalone mode.
Steps
1. Install Tools and Drivers for Oracle Database API for MongoDB:
wget http://repo.mongodb.org/yum/redhat/8Server/mongodb-org/4.4/x86_64/RPMS/mongodb-mongosh-2.1.1.x86_64.rpm
wget http://repo.mongodb.org/yum/redhat/8Server/mongodb-org/4.4/x86_64/RPMS/mongodb-database-tools-100.9.5-1.x86_64.rpm
Download the packages according your OS version from:
https://repo.mongodb.org/yum/redhat/7/mongodb-org/4.4/x86_64/RPMS/
sudo rpm -ivh mongodb-mongosh-2.1.1.x86_64.rpm
sudo rpm -ivh mongodb-database-tools-100.9.5-1.x86_64.rpm
yum -y install jdk-23_linux-x64_bin.rpm
2. Install ORDS
ORDS-enabled schema.
For example, when are you insert a JSON document into a collection in the database foo, the API for MongoDB inserts the document into a collection in the ORDS-enabled schema (PT in our case).
Download the ORDS from:
Unzip
/u01/app/oracle/product/23.0.0.0/dbhome_1/ords
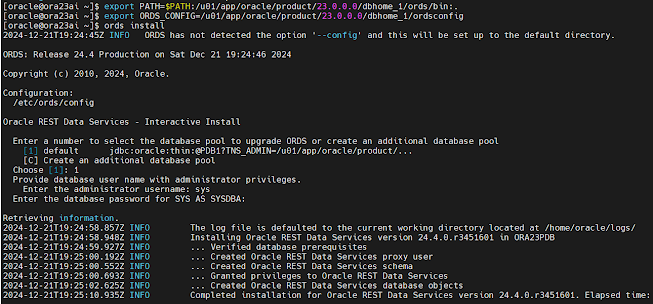
Set environment and install ORDS
mkdir -p /u01/app/oracle/product/23.0.0.0/dbhome_1/ordsconfig
export PATH=$PATH:/u01/app/oracle/product/23.0.0.0/dbhome_1/ords/bin:.
export ORDS_CONFIG=/u01/app/oracle/product/23.0.0.0/dbhome_1/ordsconfig
ords install
After installation you can use ctrl-c to continue the API Configuration
Configure ORDS to enable MongoDB API
Execute the next ORDS command to enable MongoDB API
ords config set mongo.enabled true
3. Create database user with correct privileges:
sqlplus system/******@pdb1
create user PT identified by ****** default tablespace users;
grant connect, create session, resource to PT;
grant soda_app, unlimited tablespace to PT;
sqlplus PT/******@pdb1
exec ords.enable_schema(true);
exit;
4. Connect
Sintaxis Reference
mongodb://[{user}:{password}@]localhost:27017/{user}?authMechanism=PLAIN&authSource=$external&ssl=true&retryWrites=false&loadBalanced=true
In our case:
mongodb://PT:*****@localhost:27017/PT?authMechanism=PLAIN&authSource=$external&ssl=true&retryWrites=false&loadBalanced=true
You can export to any variable if you want
export URI='mongodb://PT:*****@localhost:27017/PT?authMechanism=PLAIN&authSource=$external&ssl=true&retryWrites=false&loadBalanced=true'
mongosh --tlsAllowInvalidCertificates $URI
Additionally, if you want to start/stop the ords using a script, you can create, using the next:
vi $ORDS_HOME/bin/start_ords.sh
#!/bin/bash
export ORDS_HOME=$ORACLE_HOME/ords
export DATE=`date +%Y%m%d.%T`
export ORDS_CONFIG=/etc/ords/config
export ORDS_LOGS=$ORDS_HOME/logs
export LOGFILE=$ORDS_LOGS/ords_$DATE.log
export TNS_ADMIN=$ORACLE_HOME/network/admin
nohup ${ORDS_HOME}/bin/ords --config ${ORDS_CONFIG} serve >> $LOGFILE 2>&1 &
echo “View log file with : tail -f $LOGFILE”
vi $ORDS_HOME/bin/stop_ords.sh
#!/bin/bash
PATH=/usr/sbin:/usr/local/bin:/usr/bin:/usr/local/sbin:/u01/app/oracle/product/23.0.0.0/dbhome_1/bin:/u01/app/oracle/product/23.0.0.0/dbhome_1/ords/bin:$PATH
kill `ps -ef | grep [o]rds.war | awk '{print $2}'`
Add Execution Permissions to the scripts:
chmod u+x $ORDS_HOME/bin/s*.sh
Now, you can connect:
If you want more details


